利用微信公众号+腾讯云cos制作图床

工作流程

图床

  1. 公众号 发送图片,微信服务器收到后推送给配置的接口
  2. 接口收到消息、校验、解析根据消息类型路由到具体的处理类
  3. 下载图片后上传到cos服务器
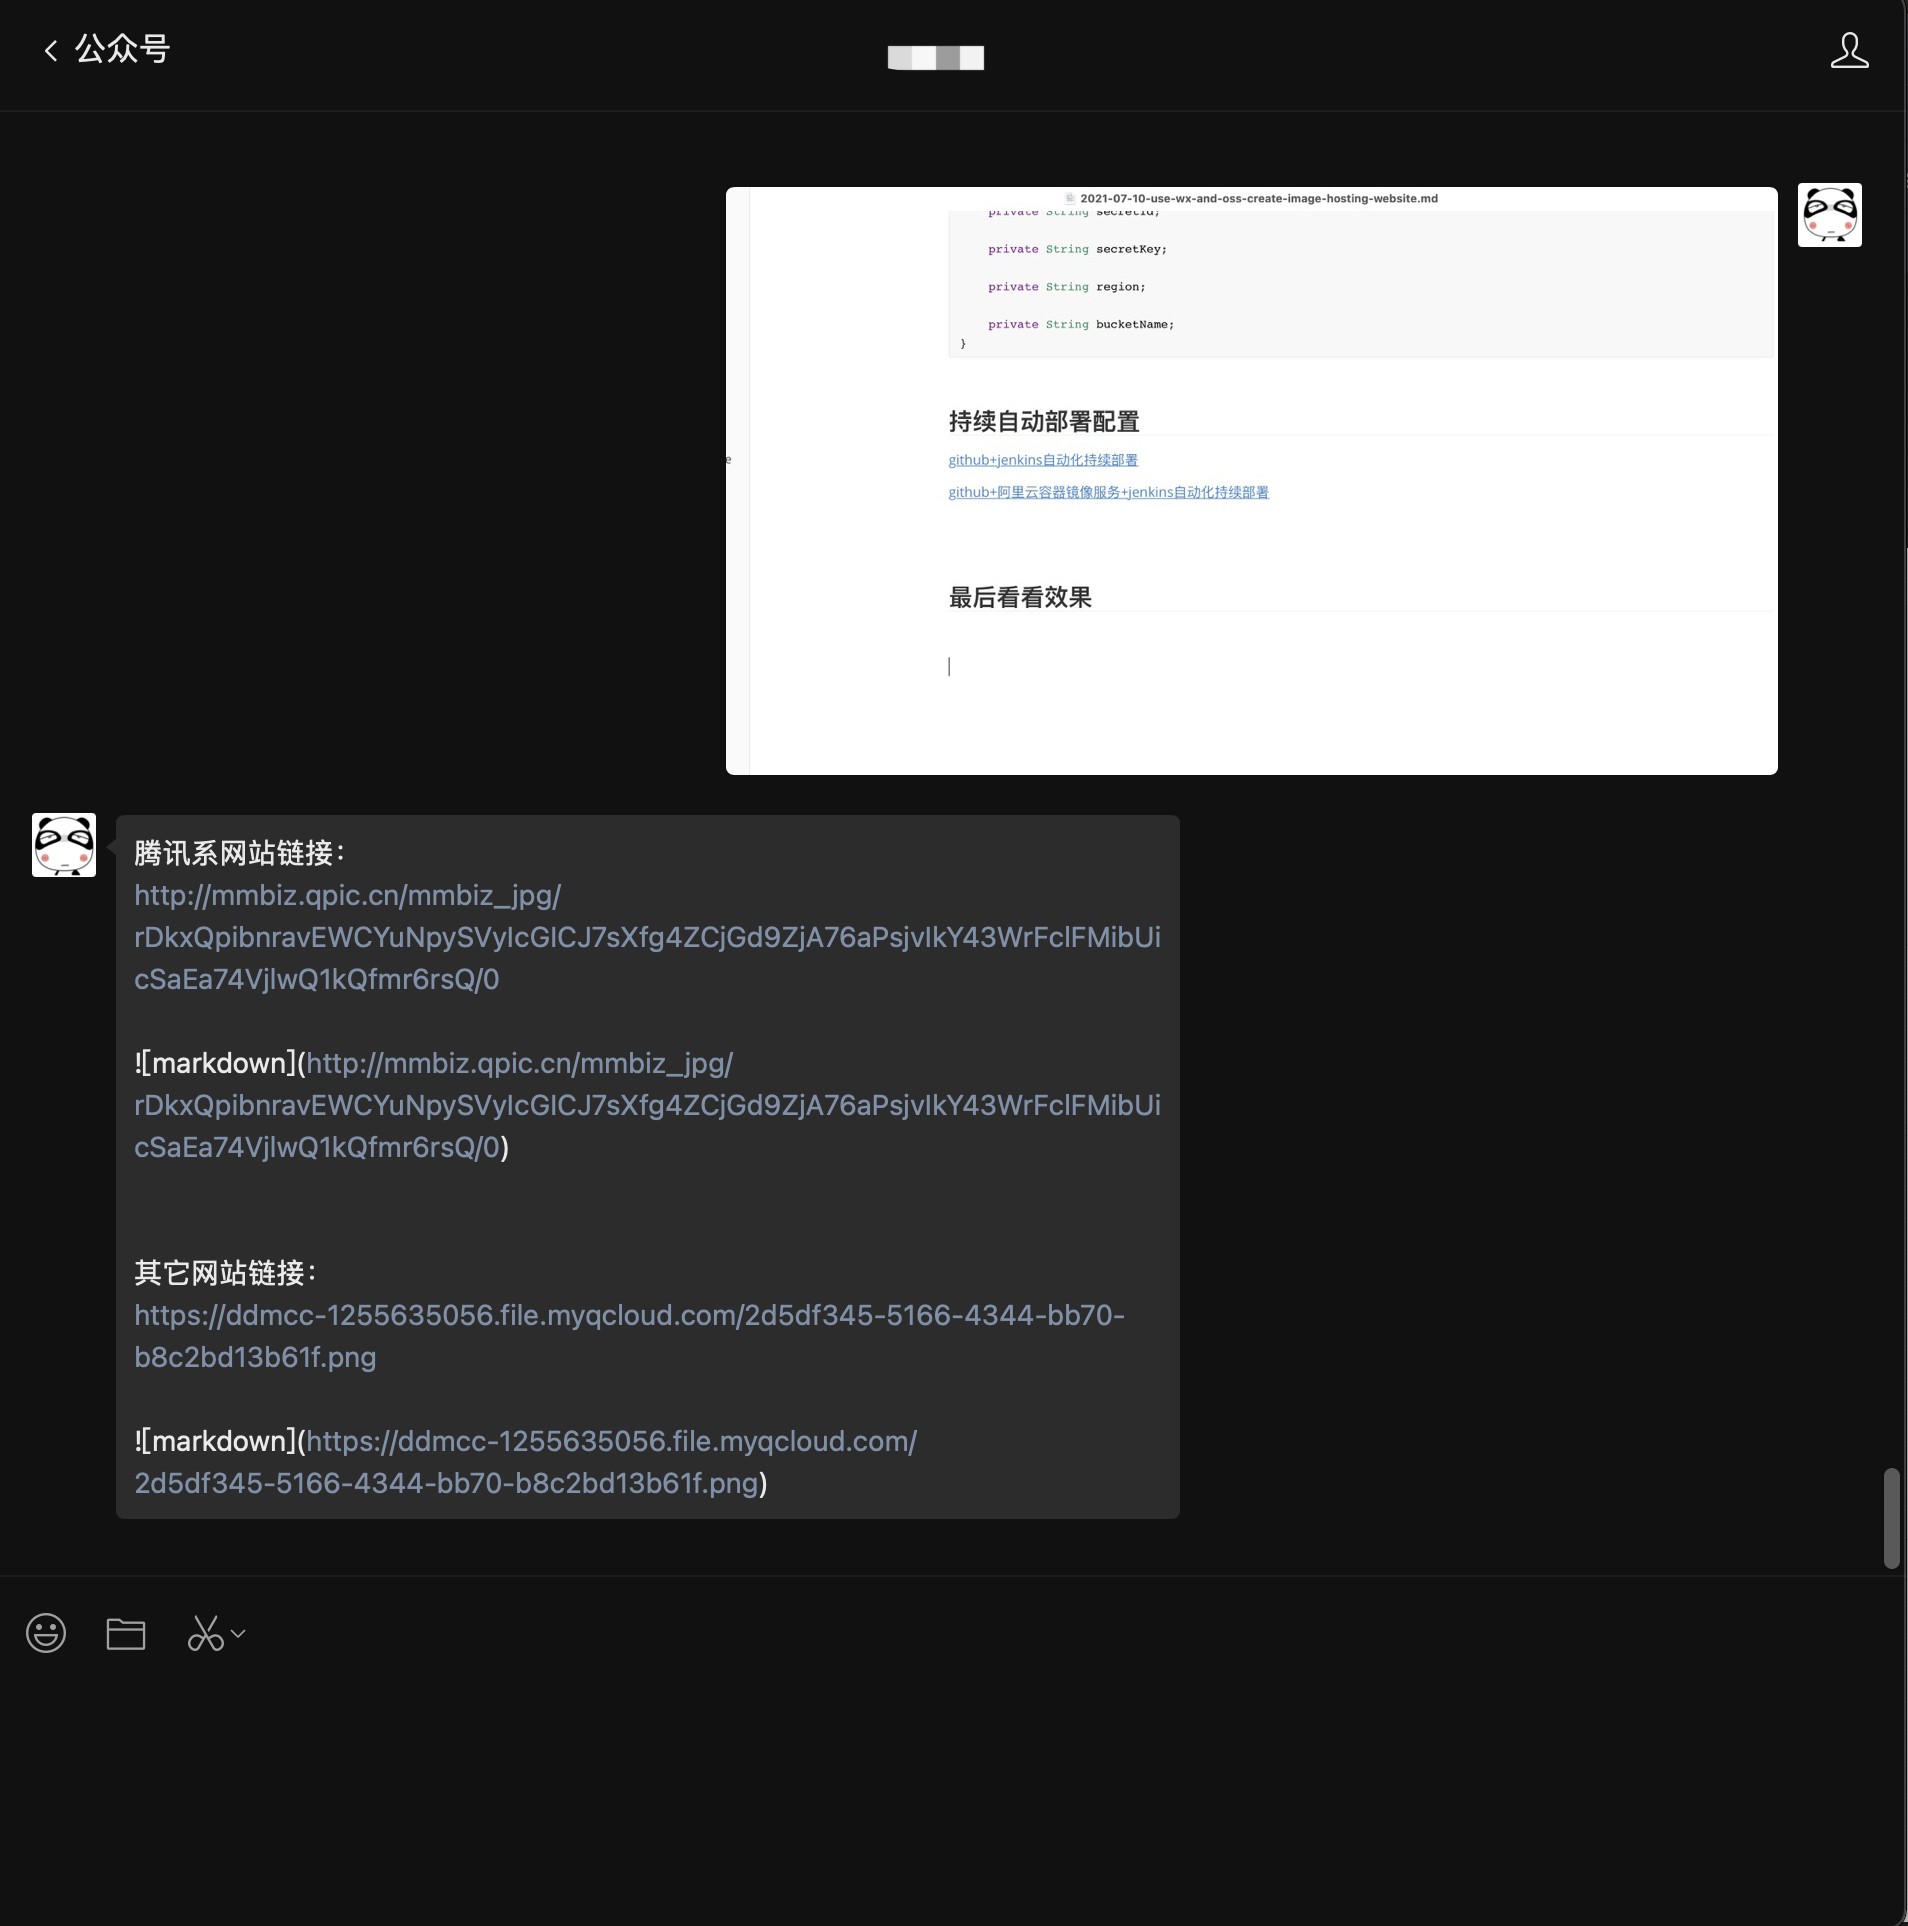
  4. 组装图片地址信息返回给发送者

自动部署

  1. githubgitlab 等推送代码,触发 webhooks 通知阿里云镜像服务
  2. 镜像服务接口到请求、拉取代码、根据 Dockerfile 构建镜像,完后根据触发器配置链接通知 jenkins
  3. jenkins 接收到请求、拉取镜像、部署

准备工作

图床

部署准备

部署的话,因为我为了方便,所以打成镜像用 docker 运行了。也可以打成 jar 包直接运行

  • 准备一台服务器

  • 安装docker、docker-compose

  • 安装jenkins

docker-compose.yml

1
2
3
4
5
6
7
8
9
10
11
12
13
14
15
16
17
18
19
version: '3.0'
services:
jenkins:
container_name: jenkins
image: 'jenkins/jenkins:lts'
restart: always
user: root
environment:
- TZ=Asia/Shanghai
ports:
- '8081:8080'
- '50001:50000'
volumes:
- /usr/bin/docker:/usr/bin/docker
- /var/run/docker.sock:/var/run/docker.sock
- /usr/local/bin/docker-compose:/usr/local/bin/docker-compose
- ./jenkins:/var/jenkins_home
- /usr/local/logs:/usr/local/logs
- /usr/lib64/libltdl.so.7:/usr/lib/x86_64-linux-gnu/libltdl.so.7
  • 安装nginx

docker-compose.yml

1
2
3
4
5
6
7
8
9
10
11
12
13
14
15
16
version: '3.1'
services:
nginx:
image: nginx:latest
container_name: nginx
restart: always
volumes:
- ./html:/usr/share/nginx/html
- ./nginx.conf:/etc/nginx/nginx.conf
- ./2_api.ddmcc.cn.key:/etc/nginx/2_api.ddmcc.cn.key # 这个是证书的没有可以不用
- ./1_api.ddmcc.cn_bundle.crt:/etc/nginx/1_api.ddmcc.cn_bundle.crt # 这个是证书的没有可以不用
- ./logs:/var/log/nginx
- ./wwwroot:/usr/share/nginx/wwwroot
ports:
- 80:80
- 443:443

nginx.cnf

1
2
3
4
5
6
7
8
9
10
11
12
13
14
15
16
17
18
19
20
21
22
23
24
25
26
27
28
29
30
worker_processes  1;

events {
worker_connections 1024;
}

http {
include mime.types;
default_type application/octet-stream;
sendfile on;
keepalive_timeout 65;
log_format main '$remote_addr - $remote_user [$time_local] "$request" '
'$status $body_bytes_sent "$http_referer" '
'"$http_user_agent" "$http_x_forwarded_for"';
access_log /var/log/nginx/access.log main;

server {
listen 80;
charset utf-8;
server_name api.ddmcc.cn;

location /index {
alias /usr/share/nginx/html;
index index.html;
}
location ^~/api/ {
proxy_pass http://127.0.0.1:10001/wxServer/api/;
}
}
}

编写实现

pom.xml 中引入依赖

1
2
3
4
5
6
7
8
9
10
11
12
<!-- 微信开发工具包 https://github.com/Wechat-Group/WxJava -->
<dependency>
<groupId>com.github.binarywang</groupId>
<artifactId>weixin-java-mp</artifactId>
<version>4.0.1.B</version>
</dependency>
<!-- cos java sdk https://mvnrepository.com/artifact/com.qcloud/cos_api -->
<dependency>
<groupId>com.qcloud</groupId>
<artifactId>cos_api</artifactId>
<version>5.6.34</version>
</dependency>

配置微信开发工具

设置与开发 –> 基本配置 –> 服务器配置 地址

application.yml 中加入

1
2
3
4
5
6
7
8
wx:
mp:
useRedis: false
configs:
- appId: # 公众号的appid
secret: # 公众号的appsecret
token: # 接口配置里的Token值
aesKey: # 接口配置里的EncodingAESKey值

服务器地址(URL) 根据自己 nginx 配置和接口地址来配置如:http://api.ddmcc.cn/api/wx/message

Controller类

1
2
3
4
5
6
7
8
9
10
11
12
13
14
15
16
17
18
19
20
21
22
23
24
25
26
27
28
29
30
31
32
33
34
35
36
37
38
39
40
41
42
43
44
45
46
47
48
49
50
51
52
53
54
55
56
57
58
59
60
61
62
63
64
65
66
67
68
69
70
71
72
73
74
75
76
77
78
79
80
81
82
83
84
85
86
87
@Slf4j
@RestController
@RequestMapping("/api/wx")
public class WeChatController {

@Autowired
private WxMpService wxService;

@Autowired
private WxMpMessageRouter messageRouter;

@Autowired
private SignUtil signUtil;

@GetMapping(value = "/message")
public String message(@RequestParam(value = "signature") String signature,
@RequestParam(value = "timestamp") String timestamp,
@RequestParam(value = "nonce") String nonce,
@RequestParam(value = "echostr") String echostr) {

log.info("微信校验接口:signature={},timestamp={},nonce={},echostr={}", signature, timestamp, nonce, echostr);
try {
if (signUtil.checkSignature(signature, timestamp, nonce)) {
log.info("接口校验成功!!");
return echostr;
}
return null;
} catch (Exception e) {
log.error("微信校验失败", e);
}
return null;
}


@PostMapping(value = "/message", produces = "application/xml; charset=UTF-8")
public String message(@RequestBody String requestBody,
@RequestParam("signature") String signature,
@RequestParam("timestamp") String timestamp,
@RequestParam("nonce") String nonce,
@RequestParam("openid") String openid,
@RequestParam(name = "encrypt_type", required = false) String encType,
@RequestParam(name = "msg_signature", required = false) String msgSignature) {

log.info("\n接收微信请求:[openid=[{}], [signature=[{}], encType=[{}], msgSignature=[{}],"
+ " timestamp=[{}], nonce=[{}], requestBody=[\n{}\n] ",
openid, signature, encType, msgSignature, timestamp, nonce, requestBody);

if (!wxService.checkSignature(timestamp, nonce, signature)) {
throw new IllegalArgumentException("非法请求,可能属于伪造的请求!");
}

String out = null;
if (encType == null) {
// 明文传输的消息
WxMpXmlMessage inMessage = WxMpXmlMessage.fromXml(requestBody);
WxMpXmlOutMessage outMessage = this.route(inMessage);
if (outMessage == null) {
return "";
}

out = outMessage.toXml();
} else if ("aes".equalsIgnoreCase(encType)) {
// aes加密的消息
WxMpXmlMessage inMessage = WxMpXmlMessage.fromEncryptedXml(requestBody, wxService.getWxMpConfigStorage(),
timestamp, nonce, msgSignature);
log.debug("\n消息解密后内容为:\n{} ", inMessage.toString());
WxMpXmlOutMessage outMessage = this.route(inMessage);
if (outMessage == null) {
return "";
}

out = outMessage.toEncryptedXml(wxService.getWxMpConfigStorage());
}

log.debug("\n组装回复信息:{}", out);
return out;
}

private WxMpXmlOutMessage route(WxMpXmlMessage message) {
try {
return this.messageRouter.route(message);
} catch (Exception e) {
log.error("路由消息时出现异常!", e);
}

return null;
}

图片消息处理类 ImageHandle

1
2
3
4
5
6
7
8
9
10
11
12
13
14
15
16
17
18
19
20
21
22
23
24
25
26
27
28
29
30
31
32
33
34
35
36
37
38
39
40
41
42
43
44
45
46
47
48
49
50
51
52
53
54
55
56
57
58
59
60
61
62
63
64
65
66
67
68
69
70
71
72
73
74
75
76
@Component
public class ImageHandler extends AbstractHandler {


@Autowired
private CosUploader uploader;

@Autowired
private CosProperties cosProperties;

/**
* 处理微信推送消息.
*
* @param wxMessage 微信推送消息
* @param context 上下文,如果handler或interceptor之间有信息要传递,可以用这个
* @param wxMpService 服务类
* @param sessionManager session管理器
* @return xml格式的消息,如果在异步规则里处理的话,可以返回null
*/
@SneakyThrows
@Override
public WxMpXmlOutMessage handle(WxMpXmlMessage wxMessage,
Map<String, Object> context,
WxMpService wxMpService,
WxSessionManager sessionManager) {

// 1)下载图片
URLConnection connection = urlConnection(wxMessage.getPicUrl());
int length = connection.getContentLength();
try (InputStream inputStream = connection.getInputStream()) {
String uuid = UUID.randomUUID().toString();
// 2)上传到cos
PutObjectResult uploadResult = uploader.upload(inputStream, uuid + ".png", length);
if (uploadResult != null) {
// 3)返回信息拼接
String url = "https://" + cosProperties.getBucketName() + ".file.myqcloud.com/" + uuid + ".png";
String content = getContent(wxMessage.getPicUrl(), url);
return WxMpXmlOutMessage.TEXT()
.fromUser(wxMessage.getToUser())
.toUser(wxMessage.getFromUser())
.content(content)
.build();
}
}

return WxMpXmlOutMessage.TEXT()
.fromUser(wxMessage.getToUser())
.toUser(wxMessage.getFromUser())
.content("图片上传失败!!")
.build();
}


@SneakyThrows
private URLConnection urlConnection(String path) {
URL url = new URL(path);
URLConnection connection = url.openConnection();
connection.setRequestProperty("Accept-Encoding", "identity");
connection.setRequestProperty("User-Agent",
"Mozilla/5.0 (Windows NT 6.1; WOW64) AppleWebKit/537.36 (KHTML, like Gecko) Chrome/37.0.2062.120 Safari/537.36");
return connection;
}


private String getContent(String picUrl, String url) {
return String.format("腾讯系网站链接:" +
"\n%s" +
"\n\n![markdown](%s)" +
"\n\n\n" +
"其它网站链接:" +
"\n%s" +
"\n\n![markdown](%s)",
picUrl, picUrl,
url, url);
}
}

上传工具类 CosUploader

1
2
3
4
5
6
7
8
9
10
11
12
13
14
15
16
17
18
19
20
21
22
23
24
25
26
27
28
29
@Component
public class CosUploader implements Uploader {

@Autowired
private CosProperties cosProperties;

@SneakyThrows
@Override
public PutObjectResult upload(InputStream inputStream, String key, int length) {
COSCredentials cred = new BasicCOSCredentials(cosProperties.getSecretId(), cosProperties.getSecretKey());
ClientConfig clientConfig = new ClientConfig(new Region(cosProperties.getRegion()));
// 3 生成 cos 客户端。
ObjectMetadata objectMetadata = new ObjectMetadata();
objectMetadata.setContentLength(length);
objectMetadata.setContentType("image/png");
COSClient cosClient = new COSClient(cred, clientConfig);
PutObjectRequest putObjectRequest = new PutObjectRequest(cosProperties.getBucketName(), key, inputStream, objectMetadata);
try {
return cosClient.putObject(putObjectRequest);
} catch (CosClientException e) {
e.printStackTrace();
} finally {
cosClient.shutdown();
}

return null;
}

}

cos上传服务配置

配置cos服务密钥、存储桶、区域信息 地址

application.yml 中加入

1
2
3
4
5
6
wx:
cos:
secret-id: # secretId
secret-key: # secretKey
bucket-name: # 存储桶名称
region: # 区域

配置属性类

1
2
3
4
5
6
7
8
9
10
11
12
@Data
@ConfigurationProperties(prefix = "wx.cos")
public class CosProperties {

private String secretId;

private String secretKey;

private String region;

private String bucketName;
}

持续自动部署配置

Dockerfile

1
2
3
4
5
6
7
8
FROM openjdk:8-jre
FROM maven:3.5.3
RUN mkdir /app
ADD . /app/
WORKDIR /app
RUN mvn clean package
ENTRYPOINT ["java", "-jar", "/app/bills-application/target/bills-application-1.0.0.jar", "--spring.profiles.active=prod"]
EXPOSE 10001

自动化持续部署

github+jenkins自动化持续部署

github+阿里云容器镜像服务+jenkins自动化持续部署

最后看看效果

markdown

评论